Well I had to start with an IPA. That is one of my favorite styles of beer – and by far the most consumed beer since I moved to Portland at least. I’ve had some great Citra (hops) based ones so I wanted to incorporate some Citra for sure. I went to my friendly local brew-supply store F.H. Steinbart on SE 12th Ave and they had a NW Style IPA recipe that I modified a little bit. Here’s the ingredients:
- 10 lb Golden Promise Malt
- 1 lb British Crystal Malt
- 1 lb Munich Malt
- 2oz Columbus (CTZ) hops
- 2oz Citra Hops
- 2oz Cascade Hops
- Wyeast 1056 yiest
- 23L water to start, 2.5L to sparge

Braumeister Malt Pipe Filled
The Braumeister lets you program in the basics of the recipe and alerts you each step of the way (and maintains the temperature of the current step if you are not right there to take action when it beeps). One of the benefits of an electric kettle with a brain and some memory is that you can brew with a method called step mashing. This basically means that you can go through a series of very specific and accurate temperature cycles when you mash (extract sugar from the grains). There are different opinions on the topic. In general it seems to me that the ones brewing with a propane burner argues that the step mashing is not needed with ‘modern malts’ as you can get all the sugars you need extracted at 155F for 1 hour. The more in depth articles I’ve found on the topic argues that there could indeed be a benefit to step mashing. Not necessarily to get more sugars to produce alcohol, but also to release non-fermentable sugars and other compounds that can impact the taste and body or mouthfeel of the beer. I particularly found this BeerSmith Home Brewing Blog article helpful in understanding the basics. This is what I ended up doing: (I know my measurements and temps are a mish-mash of metric and imperial – sorry but I am a European living in the US for the last 25 years so I am messed up + the machine thinks in German)
- Add about 23 L water (nothing fancy -garden hose to fill up)
- Mash-in @ 38C (let the water heat up then fill in the grains)
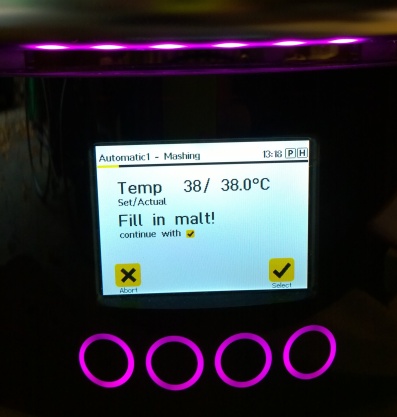
Alerted to fill in the malt
- Heat up to 63C – let the grains rest at this temperature for 40 min (Maltose Rest)
- Heat up to 72C – rest for 20 min (saccrification rest)
- Heat up to 78C – rest for 15 min (saccrification rest)
- Remove malts – they are contained in a ‘malt pipe’ that gets lifted up and rests on a metal device above the wort to drain.

Malt pipe pulled up to drain
- Sparged with 2.5L of 78C water (heated on the stove in a kettle). This step is basically to slowly pour the water over the drained grains to extract more of the sugars and flavors out of the grains. This step can be omitted if you are sensitive to tannins and want a more smooth and light beer. With this machine it is supposedly not at as crucial as with a 1-step mash commonly done in a cooler or similar vessel.
- Then I removed the grain pipe, dumped the contents in the compost bin (although in the future I do want to explore making bread or crisps (knekkebrød) from the spent grains).
- Heat up to a boil at 100C for 80 minutes. I set it at 102C to ensure a vigorous boil.
- @ 60 minutes left in the boil I added 2oz of Columbus Hops
- @ 30 minutes left I added 1oz of Citra Hops


Hop boil!
Now the trouble starts… I lost power in my garage. The breaker tripped… it turned dark (it was dark outside at this point), and the temperature started dropping. As far as the reason, I think the outlet was not able to provide enough power. I have a 3,000W transformer that converts power to 220V to feed the European machine that only ships with European power cord/plug feeding the 2,000W heating element. I think the problem was that I also used the same outlet for a 3-bulb halogen light as well as a small Tivoli radio cranking out some DJ Friendly tunes. The transformer was very hot to the touch at this point. I was messing around with this for a while. Getting a flashlight, finding the panel – and then trying to figure out what breaker was for the garage. We just recently moved into the house and this is the first time troubleshooting at the panel. Of course all labels are washed out, probably 30 years old. So I turn them off one by one – and walk back and forth to the garage. Ugh… it took a long time and by the time it was all back up and running the temp had dropped to 95C. And took a LONG time to get back up to where I was. In hindsight – I was close enough to the end so I should have called it good and thrown in the rest of the hops without worrying about the final boil. But I ended up bringing it back to a boil and followed the last few steps:
- @ 15 minutes left I added 1oz more of Citra Hops + 1 Whirlfloc tablet to help with clarifying.
- @ 1 minute left I added 1oz Cascade Hops

Copper Immersion Chiller

Now it’s time to cool the batch down to yeast-pitching temperature. For this I got an immersion copper wort chiller. You attach this to two garden water hoses – one with cold water coming in, and one with hot water coming out. This of course needs to drain into a safe place, in my case down my driveway and eventually to a drain in the street. The water coming out is very hot for a few minutes so be careful. It took quite a while to cool off which caught me by surprise. I have read up on some ideas on how to speed the process up (the faster the better to minimize the risk of contamination), and might try some things in the future. The most interesting one involved using a leftover keg filled with ice. Pump the water in and through the ice, then out and through the chiller. Nifty. When the temp had dropped to about 70F I immediately tried to open the spicket in the Braumeister and drain to the sterilized fermenter. This was a big fail as the drain plugged up right away, and I was unable to get it going. It caused another delay and much frustration. I tried to siphon for a while, and in the end simply poured the wort into the fermenter. Without using a strain… Then I pitched the yeast. Two days later I racked it to get rid of the massive amounts of settlements and hop leaves. But in the process lost much of the yeast as well… It

IPA finally in the fermenter!
was still bubbling so I decided to leave it without adding more yeast. I think it ended up with a little bit residual sugar, maybe around 1 brix. It was in the fermenter for 15 days and was then moved to a corny keg. I added 1oz of Cascade hops for dryhopping (pellets in a hop-sock) which I will remove tomorrow after 3.5 days. I wonder if I will have to transfer to another keg to get rid of hop sediments – we shall see. I will remove the hopbag, and put some co2 pressure on it and try to get away without racking it.
I opened the keg and removed the hop bag used for dry-hopping, then put some CO2 pressure on the keg and shook it up to force a quick carbonation. I did this a few times, then reduced the pressure a bit and let it sit. A few hours later I just couldn’t stand waiting any longer and hooked up the tap line to sneak a taste.

First test – not as clear as I hoped for but quite tasty!
It is actually quite delicious. A little stronger (probably 7%) than I like, a little more hoppy than I ideally like (should ease out a little over the next two weeks (if it lasts), a little less clear than I’d like (but I do prefer taste over clarity), and perhaps a little bit more of a body and mouthfeel than I like in an IPA. And I think a little bit of residual sugar. I need to do a final reading. First one was 1.060 gravity. Last one was 1.014 with 2.5 Brix to go on 10/19. So it is at least 6.5%. But I am being nit-picky. I love that this was my first beer. I need to get the opinion of some of my beer-loving friends. I promise to post some of their feedback soon. Good or bad.
